 Trellis and footsteps/dividers in place! High winds and stormy conditions today so putting the trellis to the test today, but the legs are about 1.5 feet deep and it seemed sturdy, so I think it's good. All together, the trellis cost 7 bucks and the steps cost another 5 maybe? Those fence cedar and redwood fence boards are awesome!
Sunday, March 25, 2012
Garden times
Mel's garden plot is coming together, and this weekend I got on a few projects for her plot. We installed them yesterday and today, and it's looking good!
 Trellis and footsteps/dividers in place! High winds and stormy conditions today so putting the trellis to the test today, but the legs are about 1.5 feet deep and it seemed sturdy, so I think it's good. All together, the trellis cost 7 bucks and the steps cost another 5 maybe? Those fence cedar and redwood fence boards are awesome!
Trellis and footsteps/dividers in place! High winds and stormy conditions today so putting the trellis to the test today, but the legs are about 1.5 feet deep and it seemed sturdy, so I think it's good. All together, the trellis cost 7 bucks and the steps cost another 5 maybe? Those fence cedar and redwood fence boards are awesome!
Snowboarding
Went snowboarding last week after some rain down here, which resulted in about 22 inches of snow in the nearby mountains! I went up with Mike, Meg and a couple of their friends for the night session. It ended up being really awesome snow, kept snowing off and on during the night, and was super awesome. I was sore for the next 4 days basically everywhere on my body.

When we first got there...oh we went to Mt. High by the way. 35 bucks for 5 PM to 10 PM.

Look through the fogginess and snow and you'll see Mike's first one handed, grabbed handplant!

When we first got there...oh we went to Mt. High by the way. 35 bucks for 5 PM to 10 PM.

Look through the fogginess and snow and you'll see Mike's first one handed, grabbed handplant!
Filling knots, sanding and more sanding
So I filled the knots that dropped out by jamming a bunch of small scraps together with glue all over them into the holes, and then cutting off the tops and sanding them smooth. Someone on Tree2Sea offered up this idea and said it worked, and it seems to have. Psyched. Just hope they are strong enough and don't fall out later. Other than that, I've been truing up my rails and smoothing them out to be identical to one another. And also sanding the top and bottom of the board. Slow process with lots of sanding, but it's getting there!
 Scraps glued and jammed into place
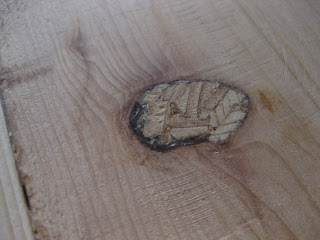
 View of one knot filled, with scraps cut off and sanded smooth. psyched!
 Another
 Getting there...
 Scraps glued and jammed into place
 View of one knot filled, with scraps cut off and sanded smooth. psyched!
 Another
 Getting there...
Tuesday, March 20, 2012
Sanding and knots
Tonight I started sanding down the top planks to be smooth and prep for glassing the board. One thing that happened though is that a few knots in a couple planks fell out due to the vibrations of the sanding. So they fell down... into the board. There is no getting them now, so it kinda sounds like small dice rolling around inside the board. Kind of a bummer, but oh well. Now I'm not totally sure how to fill the knots, but will figure it out. Again, it's awesome seeing the board really coming together! Pictures-
 From above on the tail end
 From the nose end
 Knots fell out...
Saturday, March 17, 2012
Gloomy, windy, rainy day

and I'm psyched!
 So I doubled up the top part of each rib by adding on a sliver of plywood that runs along the top of each rib. This allows for more gluing surface for the top planks, and doesn't add any weight really. Above is a picture of this, but it's kinda hard to see the extra sliver - look for the shadow jump. I read this off Tree2Sea-not my idea.
 I've gotten the top three middle planks/skins glued on now! I was able to splice a board with good grain pattern/colors and then put them mirrored on each side of the middle board. Psyched on how that came out. I've seen a few other companies who mill their own wood do this mirror effect too, so again, not my idea.
View of the third plank being glued/clamped in place. I use clamps when i can, but have to tie down the clamping boards due to lack of enough clamps.
 From the other side
 The first plank (center) went on fine, but the second plank I was having some issues, notably with this plastic wrap i was using as tie downs since I don't have enough clamps. I notched out each clamp down board (seen above) so that the tie down stays in place. But the notches kinda backfired, as they provided an edge to help the plastic rip when being stressed and pulled really tight! I had my face right down next to it once when one plastic wrap broke and the board sprung up and got me in the chin. I stopped using the plastic wrap right after that and a couple of cuss words and am now using some rope/twine that has yet to break (fingers crossed)
Tuesday, March 13, 2012
Whewwwww making progress!

Rails are done being built up! worked on them this weekend, sanding them smooth and cleaning them up
 I then needed to fair the top few strips to basically blend into the curve of the rib, so that they are eventually flush to the rib where they meet. This way the top planks that are glued onto the top of the board will then be sanded/blended into the rails. See below link with photo (to an old post) for a cross section as I'm sure that didn't make sense
http://afedbearisadeadbear.blogspot.com/2012/02/chine-strips-glued-into-place.html
 Close up of top rail strips faired into the ribs
 View from above as the board is coming together
I flipped it over and planed away the excess and rounded out the rails on the underside too! Using a handplane has become one of the most gratifying feelings ever.

This morning I glued on the middle top plank! Closing it up!
 Got a table saw this weekend from my landlord too! Thanks Janet! Here are the wood shavings from using it and splitting all the boards I'm using as the top planks. Having this table saw cut out alot of time and errors I was making using a powersaw
 Pre-bending the wood to be used for the top planks to help it glue into place easily
Monday, March 5, 2012
still doing rail strips
So I think I have seven or eight strips glued into place on each rail. Going kinda slow, but I don't have enough clamps to do two rails at a time, so oh well. The rails were kinda sagging in between each rib/support due to clamping and gravity on the clamps which then bent the rails inward more than at each support. I noticed this once at about the 5th or so rail strip this weekend, so I cut out some extra support. I just made the ends of my rib supports basically, and glued them in between each rib, to help with the sagging. I was able to pull up the sagging too with the new supports, so I'm psyched they are working out, and did not add hardly any weight to the board. Here's a pic to explain because I'm assuming that paragraph didn't make sense...
 New support in the middle
 Almost there!
Subscribe to:
Posts (Atom)