Tuesday, February 7, 2012

Bike skateboard rack!

I made a skateboard bike rack the other week and its working out pretty well, after redoing it once already. Psyched on it!


I bent some 3/8" steel wire/bar I got into the shapes I wanted. This took some creative clamping and tool use, but it bent well once clamped. I first tried just attaching it all with JB weld, and it held for one ride, but after that I could see that some welds had already broken. So I took it apart, sanded off the weld junk, and redid it with welds and some thin steel wire twisted tightly around each weld, and then clipped the excess wire off. This is working well now and no rattling. Super pumped!


I feel like it looks like a shotgun on my bike, or some other badass looking thing

SF and Amtrak train

After the work stuff on Thursday and Friday I got to stay up on Berkeley and SF the rest of the weekend. It was an awesome weekend to say the least...

Building in Oakland
I rented a bike on Saturday by the Fisherman's Wharf and rode across the Golden Gate Bridge and up into a park area and a few little towns


I cut off onto some dirt roads. This was a struggle to come up


my hybrid cruiser

chillin up top
Then I rode down to the beach and took a quick nap


Pretty nice scenery down there


And nice barreling waves the hole time!


Sausalito, CA

Sausalito, CA

View from SF after I came back across the bridge


Surf spot under the bride. I've heard the current is pretty gnarly here, but I couldn't see the guys drifting around much


I boarded the train at Jack London Square in Oakland. They had a replica of a Jack London cabin he lived in in Alaska for a while.


Off on the open tracks

Here's the setup inside. As you can see it was pretty empty


Cheesin

I was in the last car, so I had this view from the back door
Hit some tunnels just north of San Luis Obispo. Artificial solar eclipses


This looks like an instagram type photo on the edge, but that was just the edge of the window frame looking blurry. fooled you


Again, not instagram. Coming around a cool bend


Had a good watercolor setup going for a while too


Then we hit the coast and it was awesome! Just south of San Luis Obispo is where we finally got out by the ocean

That splash is a humpback whale we saw jump twice! It was crazy!


Nice coastline


Again. The coast made the trip worth it for sure


Out the back end


Here's the sight-seeing car they had open to whoever

Kitchen on Fire

So I went up to Oakland and SF this weekend for work and some fun. Thursday night we went to Kitchen on Fire as a company! It was awesome! They basically break you into groups and teach you how to make the food that you will eat that night, and then you eat!


Here's the setup with tables and stations spread out

Endives with chopped apples, walnuts, blue cheese crumbles, basil (or parsley, can't remember), and some homemade vinaigrette - these were the best thing all night!


Pizzas with lots of meat


Trying to figure out how to handle such a large calzone with a small spatula

Got it figured out

Then we twirled caramel around this stick and it hardened quickly to form twirly caramel sticks

The product
Working

The dessert! some sort of chocolate souffle that melted in your mouth


Oh and we topped it with whip cream, hazelnuts and caramel (I had two of these)


Then we ended up at the bar hotel with a bunch of people in town for the Homeowner's Association Conference going on in our hotel too. This lady impressed us all by handling five drinks at once no problem

Sunday, February 5, 2012

El Jardin, here we go again

I've been lazy with the garden lately, but I finally got motivated and began fixing it up for a new year of trial and error. I purchased a few plants that I've never grow before, artichoke and brussel sprouts. I've avoided them before because they're such large plants and I have limited space, but this year I figured why not. I can make it work. I also purchased some herbs, my had mostly died out except for rosemary which apparently is impossible to kill. Lately I've been buying herb from the grocery and I've felt like a fool every time because they're so easy to grow.
I will also rummage through all my seeds and see which are still good and worth planting.
So this year:
More flowers (trying to keep the bees happy), more herbs, tomatoes will go in pots (to keep them in check) , and hopefully many more seed success stories.
The new guys

I wish I could get this from chickens of my own.
Someday.

Tuesday, January 31, 2012

Creative clamping


got a bit creative with finding things to help with clamping. Its harder to clamp now because my clamps dont stretch all teh way across the bottom boards. I got the fourth one glued on today. Looking good, but also looking like there will be some sanding to smooth some stuff out. Psyched to see how it turns out

Sunday, January 29, 2012

Wooden surfboard frame, skins, and steaming technique

So I've still been working on this, just off and on with a busy schedule, but I've been making alot of progress the past week and a half. The skeleton was finished earlier this week, with the holes drilled and chine notch cut out (explained later on in this project), and everythign was fitted and sanded together to make sure the skins would lay on nicely. Here's some photos.

Here's the skeleton on the rocker table I made. The rocker table has all the bottom contours built up so that the skeleton ribs and spine lay supported at each rib. The rocker table took longer than I expected, but it really adds support when gluing on the skins later on. The skeleton is just a spine and then ribs every 8 inches. I used 1/4 inch marine ply for this, as I'd read that is recommended because a) it's marine grade plywood, so it's ok if wet b) it is very high grade, so there's no possible gaps in the plywood layers that could turn into weak spots. I notched halfway through on each rib, and then the opposite half of the spine, and then they fit together. The holes are drilled in to take away some unnecessary weight and allow air to flow to each chamber in the board. If the board is in hot temperatures, the pressure will build inside it, so a vent is installed so the pressure can't build up. I don't know exact rules on how big the holes can be but based on photos I saw, I went a bit conservative on the size of my holes.

Here's me making the backyard a mess. Thank you to our neighbor for never being bummed on me for taking it over.
Another shot of the skeleton frame on the rocker table.

This weekend I glued on the first skins to the frame. The skins are basically skinny fence boards from Lowes. They are western red cedar, which is used for canoes and kayaks a lot because it is very weather/water resistant, has a high resistance to decay, and it's fairly light compared to it's strength. On top of that, it's local to the western USA and Canada, and is therefore ridiculously cheap ($1.50/board, and I need about 7 for the bottom of the board, 7 for the top). Since it's from Lowe's, there's plenty of warped, knotty, badly cut pieces, but with some lengthy picking and choosing, I've found a good amount that are nice pieces. The only thing is that they come in 5/8 inch thick pieces, and I need them to be 1/4 inch thick. So I have to splice them down the middle, and then use a planer to get it down to 1/4 inch thick. Not the most exact way to do it, but it's working, it just takes a while...

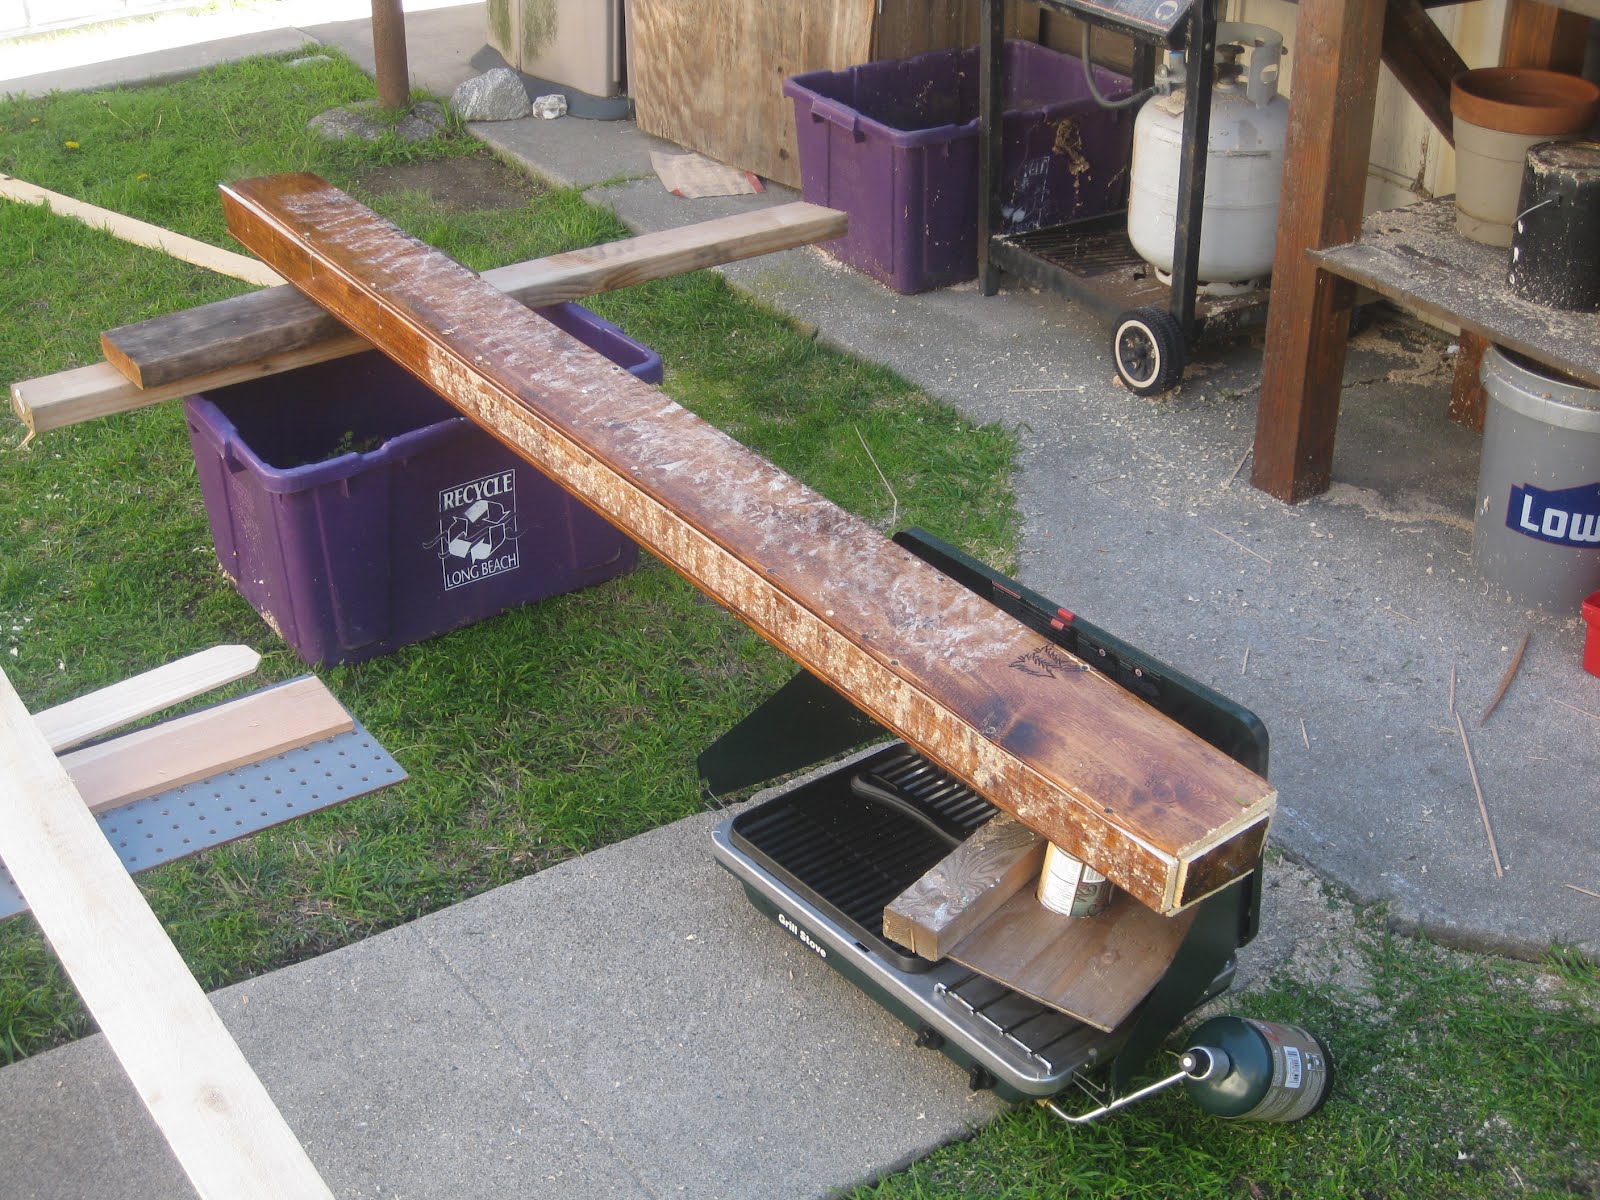
I was super pumped to try out this steam bending technique I'd read about. This is very backyard and DIY looking as you can tell, nothing professional looking at all. So I used the camp stove outside, got a pot filled with water, and brought it to boiling. Then I put a board over the pot, with a hole cut in it and a can inserted into it. This way the steam coming from the boiling water only comes up out through the can. Then I made a long hollow box that the skins can fit into. I put wires through the box so that when I insert a skin, it is held up in the air, and not flat against the bottom of the box. The box has a hole cut into it that goes right over the can, so that the steam flows right into it. I steamed one board at a time, for about ten minutes. They come out all warm and flexy. By steaming them and then setting them in place on the frame and rocker table, the boards are easier to bend, and will then be set in the shape I put them in, and not want to go back to being straight boards.

View down the can into the boiling water

Box resting on can, wih the other end supported up a bit higher, so the steam flows up and out the small holes on the other end, getting to all parts of the board inside.


Once the board is steamed and ready, I put glue onto the frame, set the board in place on the rocker table, and then clamp and tie down everything as tight as possible. I used some plastic wrap I got from Lowe's also, as Wood Surfboard Supply had offered up this as a cheap alternative to buying lots of clamps. Here's a picture of the first skin in place. After 24 hours when the glue dries, I can release the clamps and tie-downs, pick up the frame, and then steam the next skin, and put on the rocker table in the right place, and glue the frame down onto it, clamping it all in place again. This weekend, I got the first three skins on, so about 14 inches are covered on the bottom. So far they are going together pretty nicely and smoothly, but it's slightly stressful making sure all cracks are butted up against each other as much as possible, everything is aligned properly, everything is pulled down and flush with the rocker table. But yea, super super pumped that I can see it coming together now! More to come