Showing posts with label mini simmons. Show all posts

Sunday, April 22, 2012

Weird to say, but it's done!

Welp, however many weeks/months (4ish) later, it's done. Not in the water yet, but that will be this week once there's some waves again. I finished up sanding today. Since I sanded the hotcoat, and I'm not doing a gloss coat, it's flat looking, not shiny, but I'm psyched on that. My hotcoat wasn't the best, along with just tiny dimples here and there, so once I sanded it, some super small little shiny spots (low spots) remain, which the sandpaper didn't get to. There's a lot of small ones, mostly on the deck. Too many to sand, and the only option to get rid of them is to put on another thin hot coat, but I don't want to add more weight to the board, and the shiny spots are only an aesthetic thing, so whatever. Most will be covered with surf wax anyways. I'm no professional, and these bumps/shiny spots are proof! :) It does look good though I think! Got the fins done today too, and have them angled/canted right at a 3 degree angle, so I'm pumped they are in so well. The ones that I finished are on the small side, but I have two other sets I'm working on, so they will be other options, along with others down the line.


Top side, done!

Bottom side, fins in place!


Closer of fins


With the light right, you can see all the spots I'm talking about. Oh well. Learning...


I don't have a scale to weight the board, but at least for reference to my foam fish board, I figured I could at least see how much heavier it is than that board. So I whipped out some old physics and actually applied it, cool! In a nerd way. I wrapped the leashes around the ends of a board and put the board hanging over a pivot point. I scooted the board some until the boards hung there balanced. Since a moment is equal to force (weight) times distance to pivot point (M=Fd), I can at least see a multiplier of how much heavier the wooden board is than the fish. The distance from the pivot point to the fish board center of gravity was 26.5 inches. The distance from the pivot point to the wooden board is 21.5 inches. So the wooden board is 1.23 times the weight of the fish. The fish is 5'8" and 22.75 inches wide. The wooden board is 5'2" and 22 inches wide, so it puts it into perspective that the wooden board is heavier, but not too too much. This is just a fact of wooden boards though; expected it.

Pretty proud, hope it surfs well!

Went and got a burrito from Secret Spot to celebrate!

Saturday, March 17, 2012

Gloomy, windy, rainy day


and I'm psyched!

So I doubled up the top part of each rib by adding on a sliver of plywood that runs along the top of each rib. This allows for more gluing surface for the top planks, and doesn't add any weight really. Above is a picture of this, but it's kinda hard to see the extra sliver - look for the shadow jump. I read this off Tree2Sea-not my idea.

I've gotten the top three middle planks/skins glued on now! I was able to splice a board with good grain pattern/colors and then put them mirrored on each side of the middle board. Psyched on how that came out. I've seen a few other companies who mill their own wood do this mirror effect too, so again, not my idea.


View of the third plank being glued/clamped in place. I use clamps when i can, but have to tie down the clamping boards due to lack of enough clamps.

From the other side

The first plank (center) went on fine, but the second plank I was having some issues, notably with this plastic wrap i was using as tie downs since I don't have enough clamps. I notched out each clamp down board (seen above) so that the tie down stays in place. But the notches kinda backfired, as they provided an edge to help the plastic rip when being stressed and pulled really tight! I had my face right down next to it once when one plastic wrap broke and the board sprung up and got me in the chin. I stopped using the plastic wrap right after that and a couple of cuss words and am now using some rope/twine that has yet to break (fingers crossed)

Tuesday, March 13, 2012

Whewwwww making progress!


Rails are done being built up! worked on them this weekend, sanding them smooth and cleaning them up

I then needed to fair the top few strips to basically blend into the curve of the rib, so that they are eventually flush to the rib where they meet. This way the top planks that are glued onto the top of the board will then be sanded/blended into the rails. See below link with photo (to an old post) for a cross section as I'm sure that didn't make sense
http://afedbearisadeadbear.blogspot.com/2012/02/chine-strips-glued-into-place.html
Close up of top rail strips faired into the ribs


View from above as the board is coming together


I flipped it over and planed away the excess and rounded out the rails on the underside too! Using a handplane has become one of the most gratifying feelings ever.


This morning I glued on the middle top plank! Closing it up!


Got a table saw this weekend from my landlord too! Thanks Janet! Here are the wood shavings from using it and splitting all the boards I'm using as the top planks. Having this table saw cut out alot of time and errors I was making using a powersaw


Pre-bending the wood to be used for the top planks to help it glue into place easily

Wednesday, February 15, 2012

Chine strips glued into place

So I made some good progress this week. I have all the bottom skins glued in place now, and this week I glued in the chine strips on each side of the board. The chine strip fits into notches I cut in the bottom outside corners of each rib. It acts as sacrificial meat to be sanded away on the rails and still have some structural strength there internally. below are some pictures that probably display this better than I can describe.


These are cross sections of the rail, with the end of the rib showing. The top pic just shows bead and cove strips being used, whereas the bottom is just square rail strips being used. So the chine strip is glued into the notches. Then the rails of the surfboard are built up from the bottom up around the curve of each rib by gluing in 1/4 inch by 1/4 inch strips of wood that run the length of the board. Each strip is glued on top of the previous and follows the curve of each rib. Then since, you don't want squared off corners on the bottom of your surfboard, you sand away some of the wood to create a bottom curve (seen in the top photo) (these photos are from Tree 2 Sea, and I did not create them or this idea).


Chine strips being glued into place


Board trimmed up along the chine strips and looking good!

Here you can see how the chine strips define the outline of the board. The chine strips are thicker up towards the front of the board where the rails will be softer, or more curved on the underside, and I therefore needed more meat to sand away up in that area. I just built up the chine strip in layers up in those areas.


another view- the single concave in the tail can be seen here! psyched it worked out!

The underside of the board, roughly trimmed up


Sunday, January 29, 2012

Wooden surfboard frame, skins, and steaming technique

So I've still been working on this, just off and on with a busy schedule, but I've been making alot of progress the past week and a half. The skeleton was finished earlier this week, with the holes drilled and chine notch cut out (explained later on in this project), and everythign was fitted and sanded together to make sure the skins would lay on nicely. Here's some photos.

Here's the skeleton on the rocker table I made. The rocker table has all the bottom contours built up so that the skeleton ribs and spine lay supported at each rib. The rocker table took longer than I expected, but it really adds support when gluing on the skins later on. The skeleton is just a spine and then ribs every 8 inches. I used 1/4 inch marine ply for this, as I'd read that is recommended because a) it's marine grade plywood, so it's ok if wet b) it is very high grade, so there's no possible gaps in the plywood layers that could turn into weak spots. I notched halfway through on each rib, and then the opposite half of the spine, and then they fit together. The holes are drilled in to take away some unnecessary weight and allow air to flow to each chamber in the board. If the board is in hot temperatures, the pressure will build inside it, so a vent is installed so the pressure can't build up. I don't know exact rules on how big the holes can be but based on photos I saw, I went a bit conservative on the size of my holes.

Here's me making the backyard a mess. Thank you to our neighbor for never being bummed on me for taking it over.
Another shot of the skeleton frame on the rocker table.

This weekend I glued on the first skins to the frame. The skins are basically skinny fence boards from Lowes. They are western red cedar, which is used for canoes and kayaks a lot because it is very weather/water resistant, has a high resistance to decay, and it's fairly light compared to it's strength. On top of that, it's local to the western USA and Canada, and is therefore ridiculously cheap ($1.50/board, and I need about 7 for the bottom of the board, 7 for the top). Since it's from Lowe's, there's plenty of warped, knotty, badly cut pieces, but with some lengthy picking and choosing, I've found a good amount that are nice pieces. The only thing is that they come in 5/8 inch thick pieces, and I need them to be 1/4 inch thick. So I have to splice them down the middle, and then use a planer to get it down to 1/4 inch thick. Not the most exact way to do it, but it's working, it just takes a while...

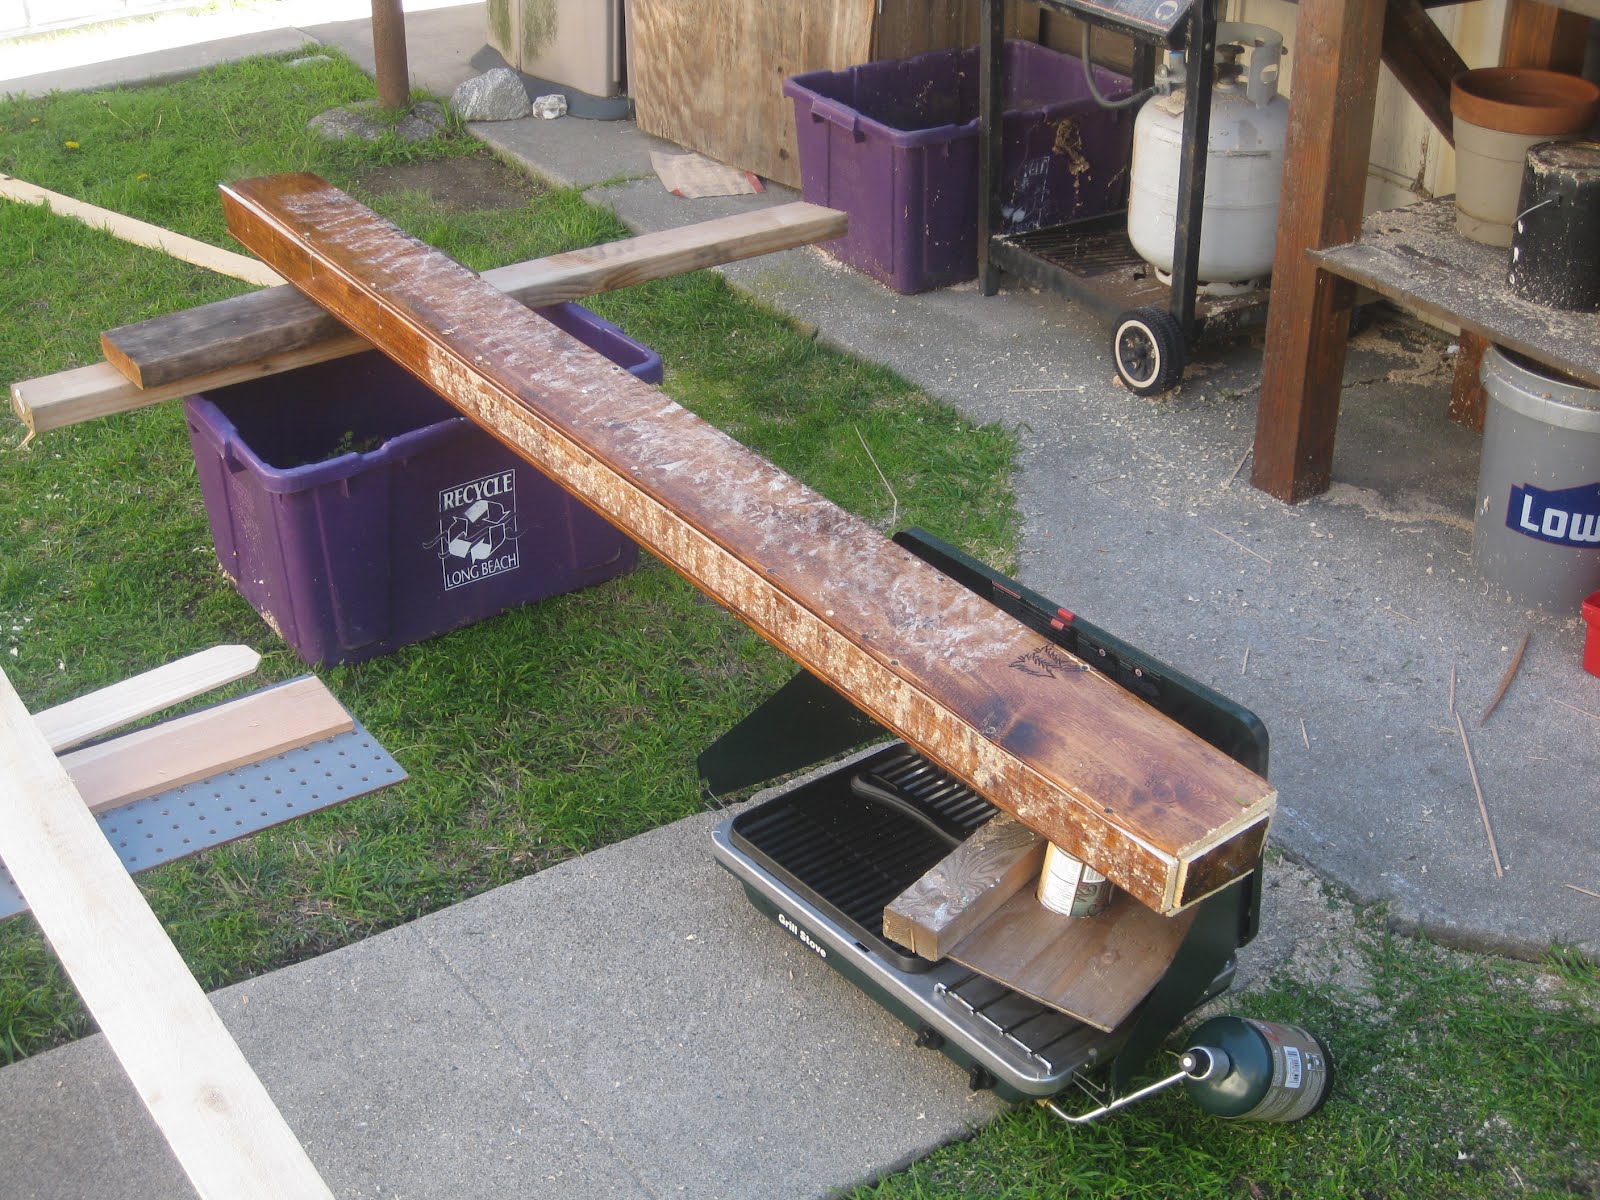
I was super pumped to try out this steam bending technique I'd read about. This is very backyard and DIY looking as you can tell, nothing professional looking at all. So I used the camp stove outside, got a pot filled with water, and brought it to boiling. Then I put a board over the pot, with a hole cut in it and a can inserted into it. This way the steam coming from the boiling water only comes up out through the can. Then I made a long hollow box that the skins can fit into. I put wires through the box so that when I insert a skin, it is held up in the air, and not flat against the bottom of the box. The box has a hole cut into it that goes right over the can, so that the steam flows right into it. I steamed one board at a time, for about ten minutes. They come out all warm and flexy. By steaming them and then setting them in place on the frame and rocker table, the boards are easier to bend, and will then be set in the shape I put them in, and not want to go back to being straight boards.

View down the can into the boiling water

Box resting on can, wih the other end supported up a bit higher, so the steam flows up and out the small holes on the other end, getting to all parts of the board inside.


Once the board is steamed and ready, I put glue onto the frame, set the board in place on the rocker table, and then clamp and tie down everything as tight as possible. I used some plastic wrap I got from Lowe's also, as Wood Surfboard Supply had offered up this as a cheap alternative to buying lots of clamps. Here's a picture of the first skin in place. After 24 hours when the glue dries, I can release the clamps and tie-downs, pick up the frame, and then steam the next skin, and put on the rocker table in the right place, and glue the frame down onto it, clamping it all in place again. This weekend, I got the first three skins on, so about 14 inches are covered on the bottom. So far they are going together pretty nicely and smoothly, but it's slightly stressful making sure all cracks are butted up against each other as much as possible, everything is aligned properly, everything is pulled down and flush with the rocker table. But yea, super super pumped that I can see it coming together now! More to come