So I've been working on the rails for the past week or so now, which is a bit time consuming because I have to cut each strip (1/4" thick and 3/8" wide), and then use my router to route each side of it into a bead and cove strip (see picture explaining this method here: http://afedbearisadeadbear.blogspot.com/2012/02/chine-strips-glued-into-place.html) . Above is the router in place, with featherboards to guide each strip accurately.
 On one side of the strip I put a bead on it-basically a half circle
 On the other side I put a cove into it - an indented half circle
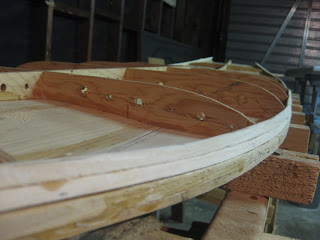
 Then I glue them in place, one at a time. Here is a pic of three of them stacked on top of each other. Each strip runs the length of the board and since there is the bead and cove routed into each strip, it fits right on top of the strip below it, and is ready for the next strip to fit right in on top of it. I just glue them in place, following the curve of each rail section, and it all blends together. Pretty pumped how easy it is to glue into place when I have routed the strip well.
Here is another pic of them clamped in place. This rail section is more towards the tail of the board, so you can see as the rail progresses up, it goes inward kinda harshly too. The picture above is the rail section towards the middle of the board, where the board is thicker, so the rail has a slower curve inward
 Another pic, without clamps or tie-downs
 And here's a pizza Mel made this weekend. Spinach, mushrooms, cheese and egg! Try it out!
No comments:
Post a Comment