Good times were had in Indiana. I loved seeing my family and friends and meeting chicks and babies couldn't have been more appropriate for the spring season.
Wednesday, April 18, 2012
Indiana
Good times were had in Indiana. I loved seeing my family and friends and meeting chicks and babies couldn't have been more appropriate for the spring season.
Tuesday, April 17, 2012
Rachael Franklin was in town!
Our old college friend Rachael was in town on Sunday from London! We met up and ate awesome mexican food, serving our constant craving for it and getting it back into Rachael's system. It was awesome awesome awesome to see her! I think the only time we go up to LA or Hollywood area is when people are in town....
Proof we saw her!
Monday, April 16, 2012
Van Ramp Rebuild
I got to help out with the first part of the rebuilding/redesign of the Vans ramp thsi past weekend. Dalen got this redesign going, and made it happen. This si where I spent most of Saturday and some of Sunday. It was good to be working on a skateboard ramp again...
Before
Redesign plans
First we just took off all the skatelite
And then took off more plywood
And more plywood
A lot more wood was removed that isn't shown here
Started removing and moving quarterpipes around
Got some in place. these dudes were in charge
Got some more in place
This is the end of day 2 for me. They were still working. Should be done by this coming Friday??????
Glassed the top of the board!
So I ended up using a layer of 4 oz S cloth, and a deck patch of 4 oz S cloth. The board, again is, 5'1" x 22" (at wide point) x 3" thick (at wide point), so roughly 1020 in² or 7.1 ft² on the bottom surface.
The resin amounts are: clear epoxy resin- 16 oz of mixed epoxy resin
blue epoxy resin - 4 oz mixed epoxy resin
Monday, April 9, 2012
Lots of progress!
So I haven't posted in a while, so here's some progress I've been making. Getting closer to being done!
I clamped on the nose and tail blocks after finishing the top planks, and sanding it all smooth. The tail block came out good first try, but the nose block looked like crap the first couple of tries....
Tail block glued into place...
Tail block sanded flush and smooth and to the shape I wanted. pumped on how the grain looks on the end of the wood.
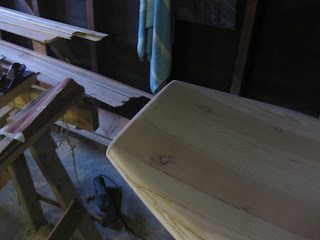
The nose looked way to squared off first try, obviously. Look at it. Bad.
So then I cut off the first attempt at the nose block and glued on a lot more pieces to have more room to make it rounder... again it looked bad, squared off, adn not like a nose, and not like I wanted. Then I saw how guys do nose blocks with slanted pieces of wood, not straight across like I was trying. This should have been the obvious way to do it, but I've never done it, so it didn't cross my mind at first. Below is is a picture of this way
So I picked an angle and cut off the two sides symmetrically. The good part about this, is that see those two knots there towards the nose?- Those are two knots that had fallen into the board and I replaced. They were rolling around like dice in there. When I cut the slants, I opened up the two chambers that the knots were in and I was able to shake them out. There's still other knots in the board in other chambers unfortunately, but now there's two less!
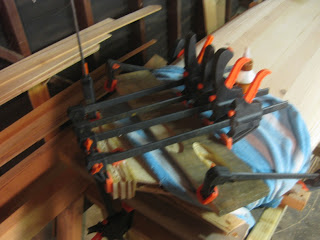
Then I glued on boards on one slant. Once these dried, I cut them back so that I could glue on the other side of the slants and it be flush with each other. I forgot to take a picture of that and the end product up close, but here's one of the board and the end of the nose...
Board with burnt wood cross section on it, all sanded and ready to glass...
End view of nose block. Psyched on how this one turned out.
Another thing I did was router in the fin boxes and install them. I made two jigs, one for the top layer of the fin box, and one for the deeper layer of it. Here is the deeper layer jig. The jigs took several attempts to make and get them within a good tolerance, but psyched on how it turned out. This was the first time I've used a jig with a router, so I was scared to just plunge into the board, but it worked well! Again, learning more woodworking stuff.
Top and bottom layer of fin box routed out!
It fit well!
I then glassed them in by filling the hole a good amount with epoxy and milled fiber , and then pushing the fin boxes into places in the holes. This causes epoxy and stuff to ooze out of the hole, which is good. I put the fins in the fin boxes in order to line them up properly to have the right cant (angle) that the fins be when they are in the fin boxes.
Fin boxes installed!
Close up of the wood cross section that I burnt into the deck with a wood-burning pen.
Signed, dated, and dimensions listed
Then tonight I prepped and glassed the bottom side of the board! super pumped now that's it's over. This is stressful since you only have about 20-30 minutes to do it once the hardener is added to the epoxy resin. On my first board it didn't come out so well and took a lot of extra work to fix my mistakes. This one came out better, but still not perfect. Learning... Here I cut ovals to go over the fin boxes to support them more, and then laid the cloth of the board over them.
Ready to glass...
Mixed up the clear resin and some blue resin for a stripe! ready set go!
Phew! all done. I wasn't totally done when the resin started gelling, but I was able to handle it and got it all smooth and wrapped around the rails eventually. This looks good! The bedroom was used cuz it's perfect size and easy to control the temperature in with the little space heater we have. The bed was moved to the hallway and is up on it's side. Mel's not here, it's ok! :) Ok that's all, more to come, but it's getting close to being done!
For my reference, or anyone else's out there, here are the resin amounts that I ended up using: The board is 5'1" x 22" (at wide point) x 3" thick (at wide point), so roughly 1020 in² or 7.1 ft² on the bottom surface.
I used one layer of 4 oz "S" cloth on the bottom, and had clear resin and blue resin. I used 15 oz of mixed (epoxy resin and hardener at a 2:1 ratio, so 10 oz resin, 5 oz hardener) clear epoxy resin, and 4.25 oz of mixed (epoxy resin and hardener at a 2:1 ratio, so 2.83 oz resin and 1.42 oz hardener) blue epoxy resin. This is slightly more than I read that I should end up using, which I fortunately expected, so I had some epoxy left over of both colors. I'm sure I just spilled some here and there too.
For my reference, or anyone else's out there, here are the resin amounts that I ended up using: The board is 5'1" x 22" (at wide point) x 3" thick (at wide point), so roughly 1020 in² or 7.1 ft² on the bottom surface.
I used one layer of 4 oz "S" cloth on the bottom, and had clear resin and blue resin. I used 15 oz of mixed (epoxy resin and hardener at a 2:1 ratio, so 10 oz resin, 5 oz hardener) clear epoxy resin, and 4.25 oz of mixed (epoxy resin and hardener at a 2:1 ratio, so 2.83 oz resin and 1.42 oz hardener) blue epoxy resin. This is slightly more than I read that I should end up using, which I fortunately expected, so I had some epoxy left over of both colors. I'm sure I just spilled some here and there too.
Monday, April 2, 2012
Growing
Things are coming along quite nicely. The home garden is thriving, with the artichoke and brussel sprout growing on a daily basis. These plants are going to be monsters. The cutworms are after the brussel sprout, but I pick them off before any real damage is done. Matt doesn't like that I do it, but squishing those little devils feels kind of good....

I had a surprise zucchini sprout come up so I went and bought it a few friends. So by summer I should be begging people to take them off my hands.

The sugar snap peas finally sprouted, so our window will be cover with a pretty green vine soon enough.

The herbs are all doing well, but that's pretty standard. Herbs are so easy, everyone should give a go. There no point in buying a bunch of fresh herbs at the store when you can grow an endless supply at home for the same price or less.

Now, the community garden plot is finally starting to shape up. The ground was super hard The talented Matt Zwiesler made a beautiful trellis and now its on me to make stuff grow to put it to good use. Some plot neighbors gave me a couple green bean seedling, because they had more than they needed. I also planted sugar snap peas next to the beans.
The first seeds to go in were cabbage, leek, carrots, onion, swiss chard, and lettuce. A couple days ago I was getting discourage because there was no green appearing on that mound of dirt. I was ready to cave and purchase some topsoil and try again, but most have sprouted at last!
I'm still waiting on the onion and leek, but some of the seeds are old and I think they take longer anyways.


I couldn't be any happier with the garden plot.
I had a surprise zucchini sprout come up so I went and bought it a few friends. So by summer I should be begging people to take them off my hands.
The sugar snap peas finally sprouted, so our window will be cover with a pretty green vine soon enough.
The herbs are all doing well, but that's pretty standard. Herbs are so easy, everyone should give a go. There no point in buying a bunch of fresh herbs at the store when you can grow an endless supply at home for the same price or less.
Now, the community garden plot is finally starting to shape up. The ground was super hard The talented Matt Zwiesler made a beautiful trellis and now its on me to make stuff grow to put it to good use. Some plot neighbors gave me a couple green bean seedling, because they had more than they needed. I also planted sugar snap peas next to the beans.
The first seeds to go in were cabbage, leek, carrots, onion, swiss chard, and lettuce. A couple days ago I was getting discourage because there was no green appearing on that mound of dirt. I was ready to cave and purchase some topsoil and try again, but most have sprouted at last!
I'm still waiting on the onion and leek, but some of the seeds are old and I think they take longer anyways.
I couldn't be any happier with the garden plot.
Subscribe to:
Posts (Atom)